How to Create Email Drip Campaigns in Mautic
Wondering how you can bond with new leads effortlessly? Or are you having trouble setting up your email drip campaign in Mautic? This step-by-step guide has got you covered.
Drip campaigns are an essential tool in the email marketer's arsenal. They provide a way to automate sending a series emails to your subscribers. Mautic offers a user-friendly interface to design and implement these campaigns.
So, stop worrying about losing leads due to improper email marketing! Implement your first email drip sequence in Mautic with this guide.
We'll create a simple drip sequence for new newsletter subscribers. Points covered:
How to Create a New Campaign in Mautic: Step-by-step guide to create a new campaign.
Configuring Your Campaign: Learn the implications of a campaign's publish status, start/end dates, and of allowing contacts to restart the campaign.
Defining Campaign Actions for a drip campaign: Get familiar with the fundamental campaign action: Sending emails (with timed delays).
Why should you be interested? Simply put, drip campaigns are an extremely effective method of engaging your audience, nurturing leads, and boosting conversions. If this is a new concept to you, read this:
Step 1: Creating a New Campaign
Creating a blank campaign is pretty straight forward and requires just a few clicks. The heavy lifting happens within Mautic's campaign builder. But we'll come to that later. First, there's one prerequisite you need to have:
Prerequisite: Contact Source
Before you can fully dive into creating a new campaign, it's crucial to set the stage right. The absolute key prerequisite for a successful campaign is setting up a contact source. A contact source supplies your campaign with the vital ingredient—your audience.
Make sure you have either a Contact Segment holding your target subscribers, or a Campaign Form set up to pass contacts (e.g., new subscribers) to your campaign.
Create a New Campaign
Now, let's move to the main task—creating a new campaign. To do this:
- Navigate to the 'Campaigns' section on the Mautic dashboard.
- Click on the 'New' button at the top right corner.
Mautic will show you a screen that lets you define your campaign's basic settings:
- Name: Give your campaign a unique name. It's best if that is descriptive and easy to remember.
- Description (optional): Briefly describe your campaign. This can be especially helpful if you have multiple campaigns running simultaneously.
- Category (optional): Choose an appropriate category for your campaign. This helps you to keep track of everything. If you haven't created any categories yet, you can leave this blank for now.
And there you have it! You have successfully created a new campaign. Sadly, without a contact source and campaign actions it's still completely empty and won't do anything. But before we get to the heavy lifting, let's explore the three additional settings of a campaign:
Step 2: Configuring a New Campaign
After you've created your campaign, you'll need to configure it.
There are three crucial settings that you must be aware of:
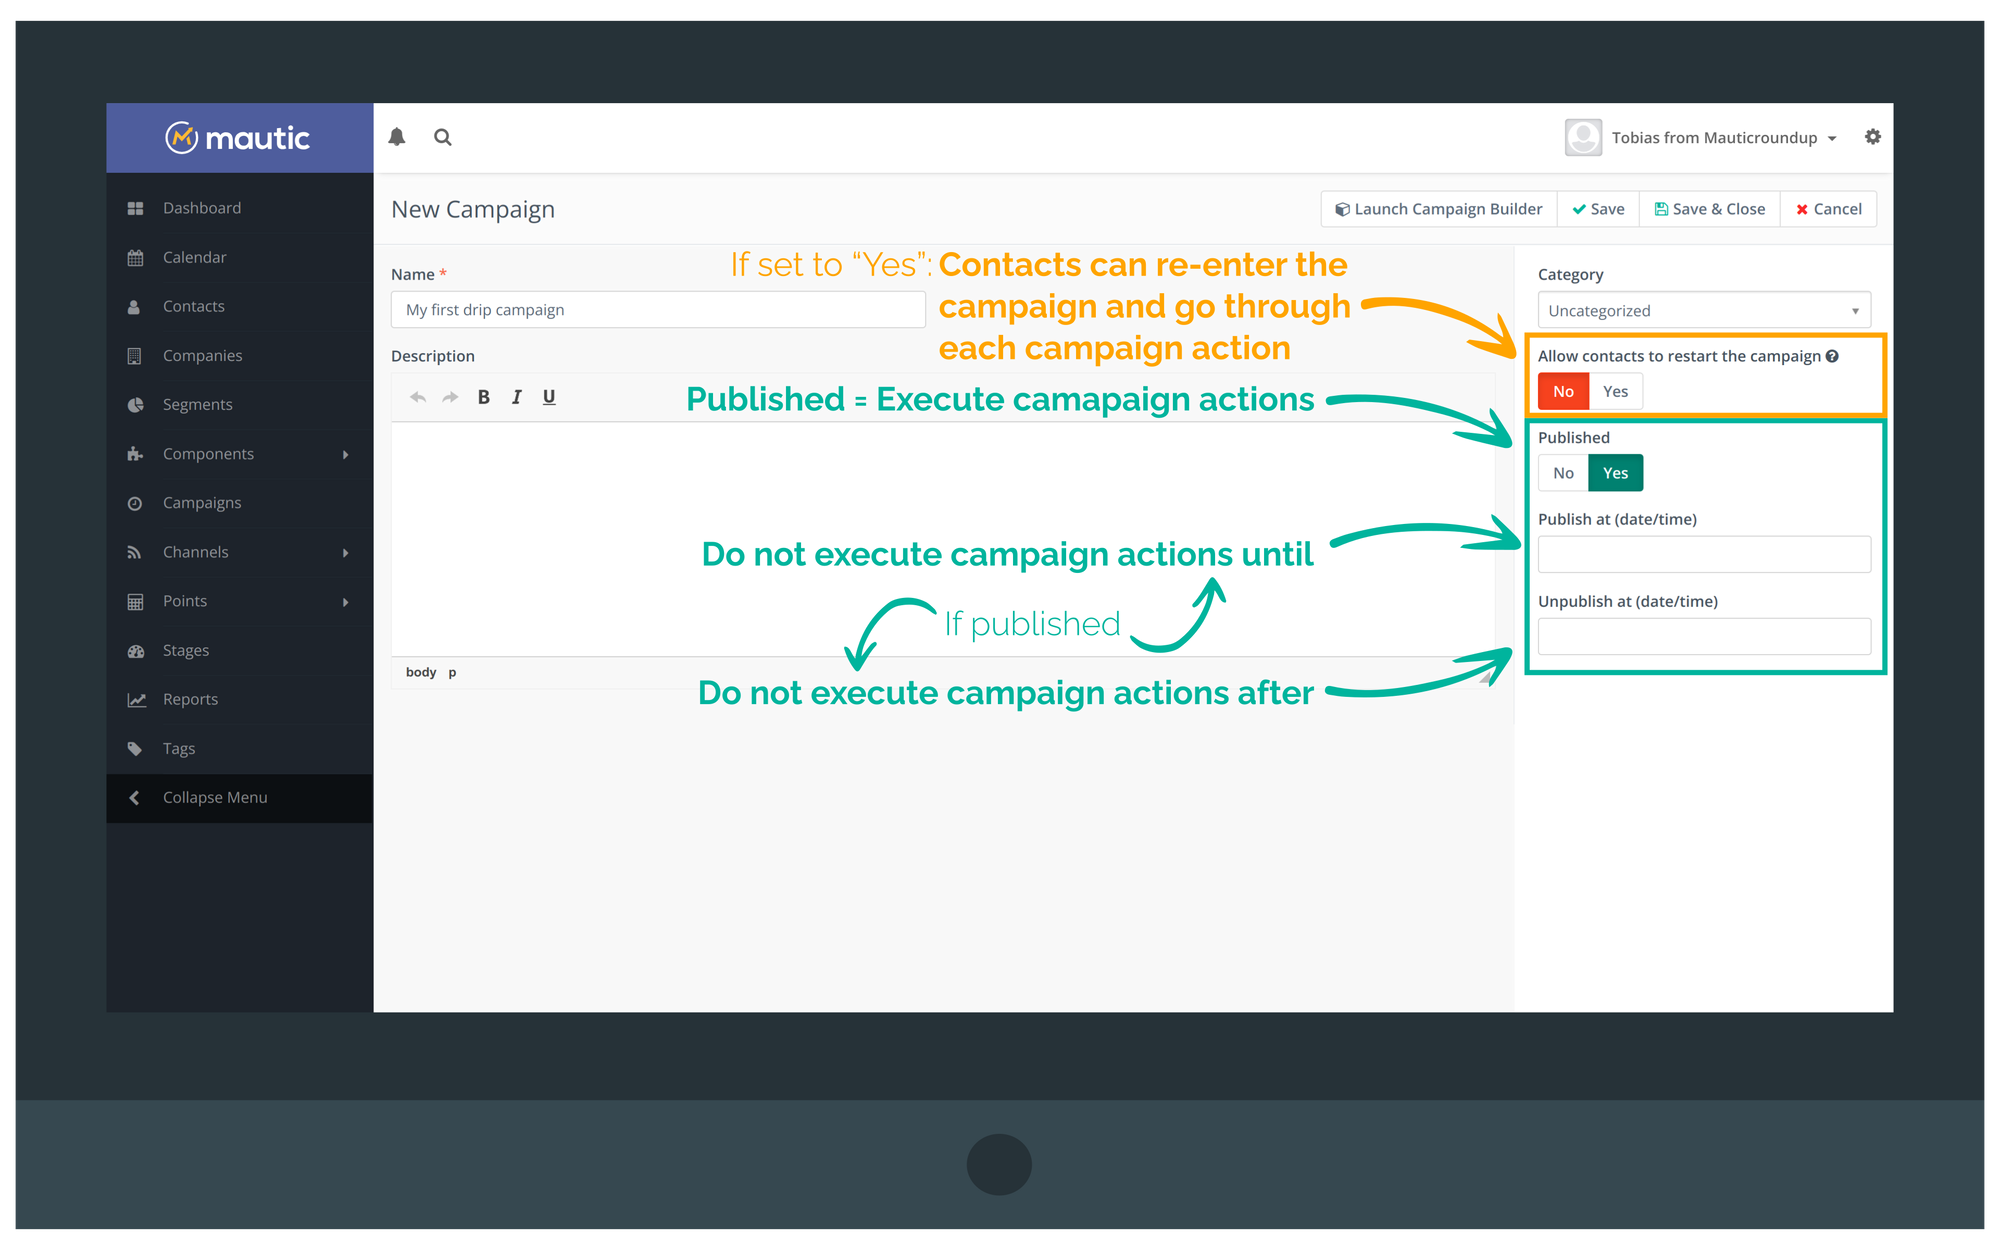
- Published: This toggle indicates whether your campaign is active or not. An unpublished campaign won't be triggered even if all conditions are met. Mautic will ignore it completely. Therefore, make sure your campaign is published when you're ready to launch.
- Publish at (date/time) and Unpublish at (date/time): These settings give you a more granular control over when your campaign is active and when not. If you wish to run your campaign during a specific timeframe, these options are a great way to automate that.
Unpublish at (date/time) setting to stop the campaign after a certain time (e.g., after Christmas).There's one catch: As soon as the campaign gets unpublished it stops completely. This means contacts in the middle of it won't finish it! Therefore, you probably want to make sure that the contact source (segment or form) stops serving contacts to the campaign in time, so that every contact has a chance to finish the campaign before it ends. You could, for example, unpublish the campaign form a week before the campaign ends.
- Allow contacts to restart the campaign: This is an important setting that determines whether contacts can go through your campaign more than once. If you want your campaign to be a one-time experience per contact, make sure this is turned off. However, if your campaign is designed to be experienced multiple times, such as a recurring promotional campaign, feel free to turn this on.
Allow contacts to restart the campaign to yes, then user A would get the same welcome drip sequence again. In the majority of cases you don't want that as they already know you and the content. A good example for “restarting” campaigns are transactional campaigns like “Reset Your Password”.You configured your campaign. Now let's enter the campaign builder and start building the actual campaign.
Step 3: Setting Up Your Contact Source
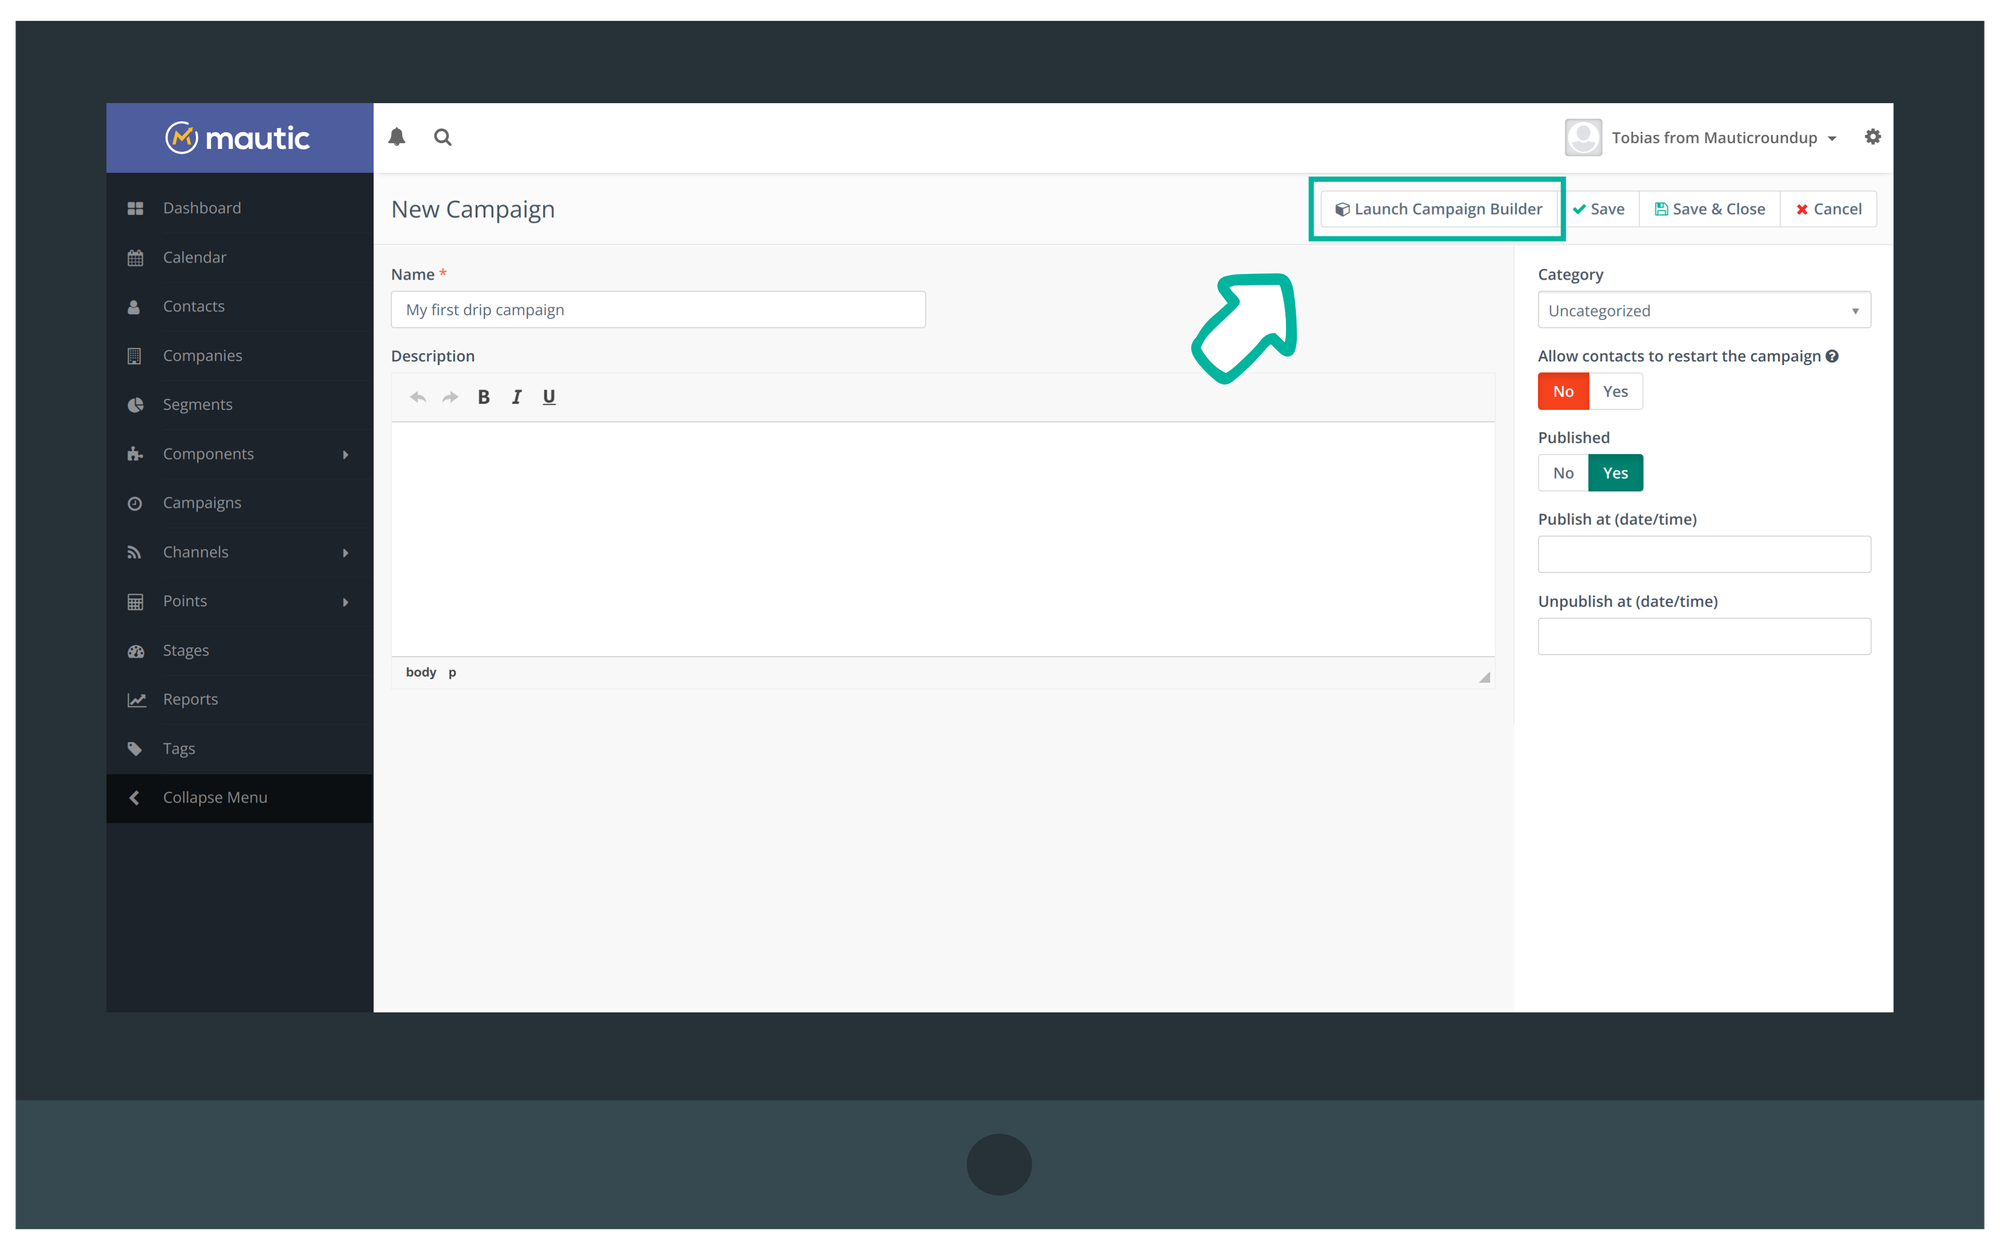
Open to the 'Campaign Builder' by clicking the 'Launch Campaign Builder' button.
As said, every campaign needs at least one contact source, which provides the contacts that'll move through the campaign. So, let's add a contact source:
- Mautic will ask you about the contact source straight away after opening the builder for the first time. Choose either 'Segment' or 'Form.'
- If you choose 'Segment,' you'll then need to select, which segment you'd like to use as your source. The same goes for 'Form.'
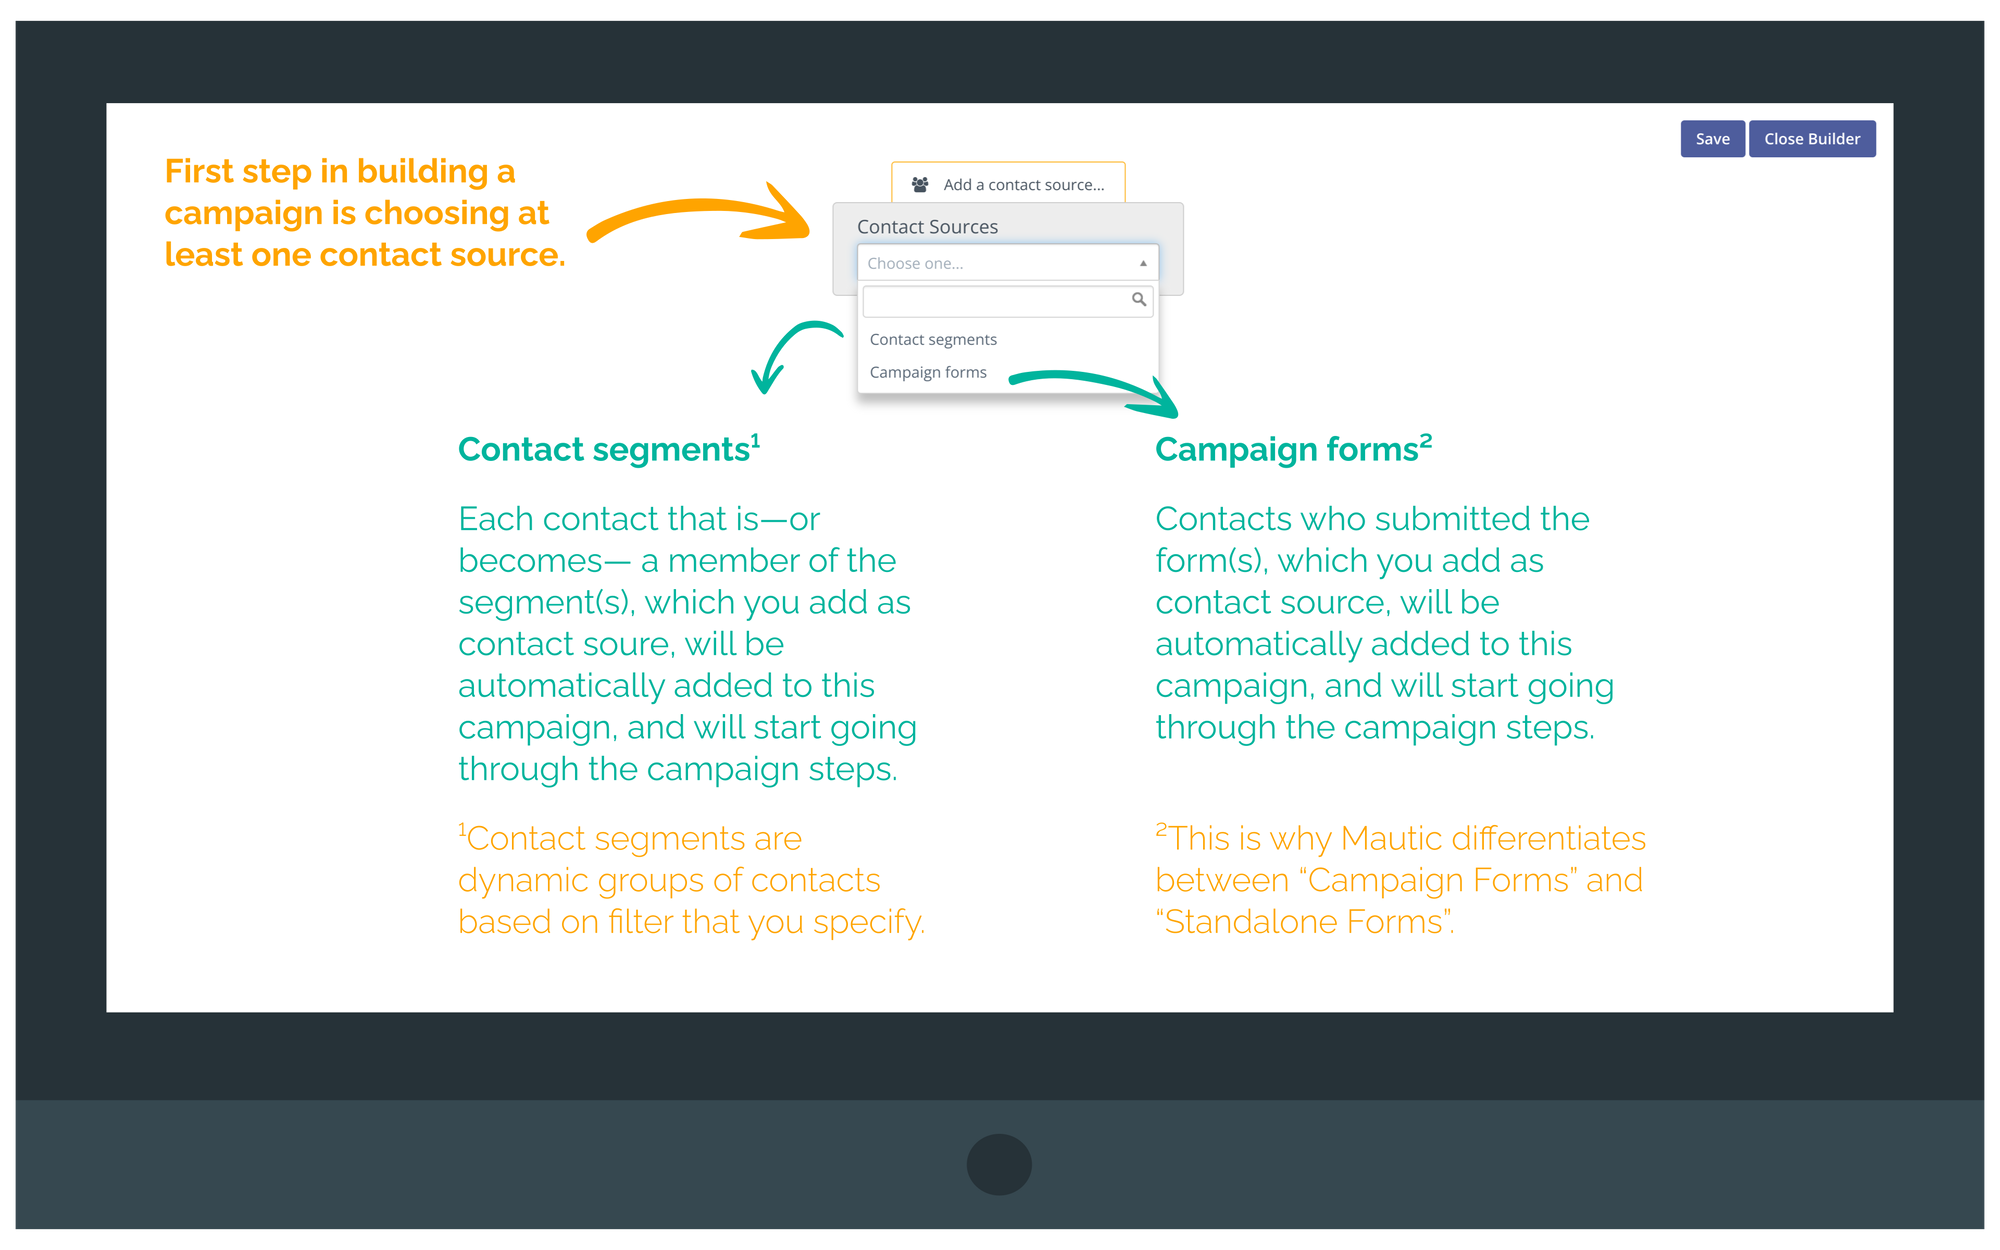
There are two types of contact sources in Mautic: Contact Segments and Campaign Forms.
Contact Segments are groups of contacts that you've created based on certain criteria. For example, you might have a segment for "Newsletter Subscribers" or "Customers Who Purchased in the Last 30 Days."
Campaign Forms are forms that you've created within Mautic for the purpose of adding those, who submit the form, to your campaign.
With choosing a campaign source you will determine who receives your automated emails. For our simple setup we'll choose our newsletter sign-up form. After making that choice you can add campaign steps.
Step 4: Defining Your Campaign Actions
Mautic performs the campaign steps/tasks that you build into the campaign on your behalf during the drip campaign.
There are many actions available in Mautic, but for our simple drip campaign, we will focus primarily on the "Send Email" action.
To define campaign actions, click on the plus icon below your campaign source field in the 'Campaign Builder'.
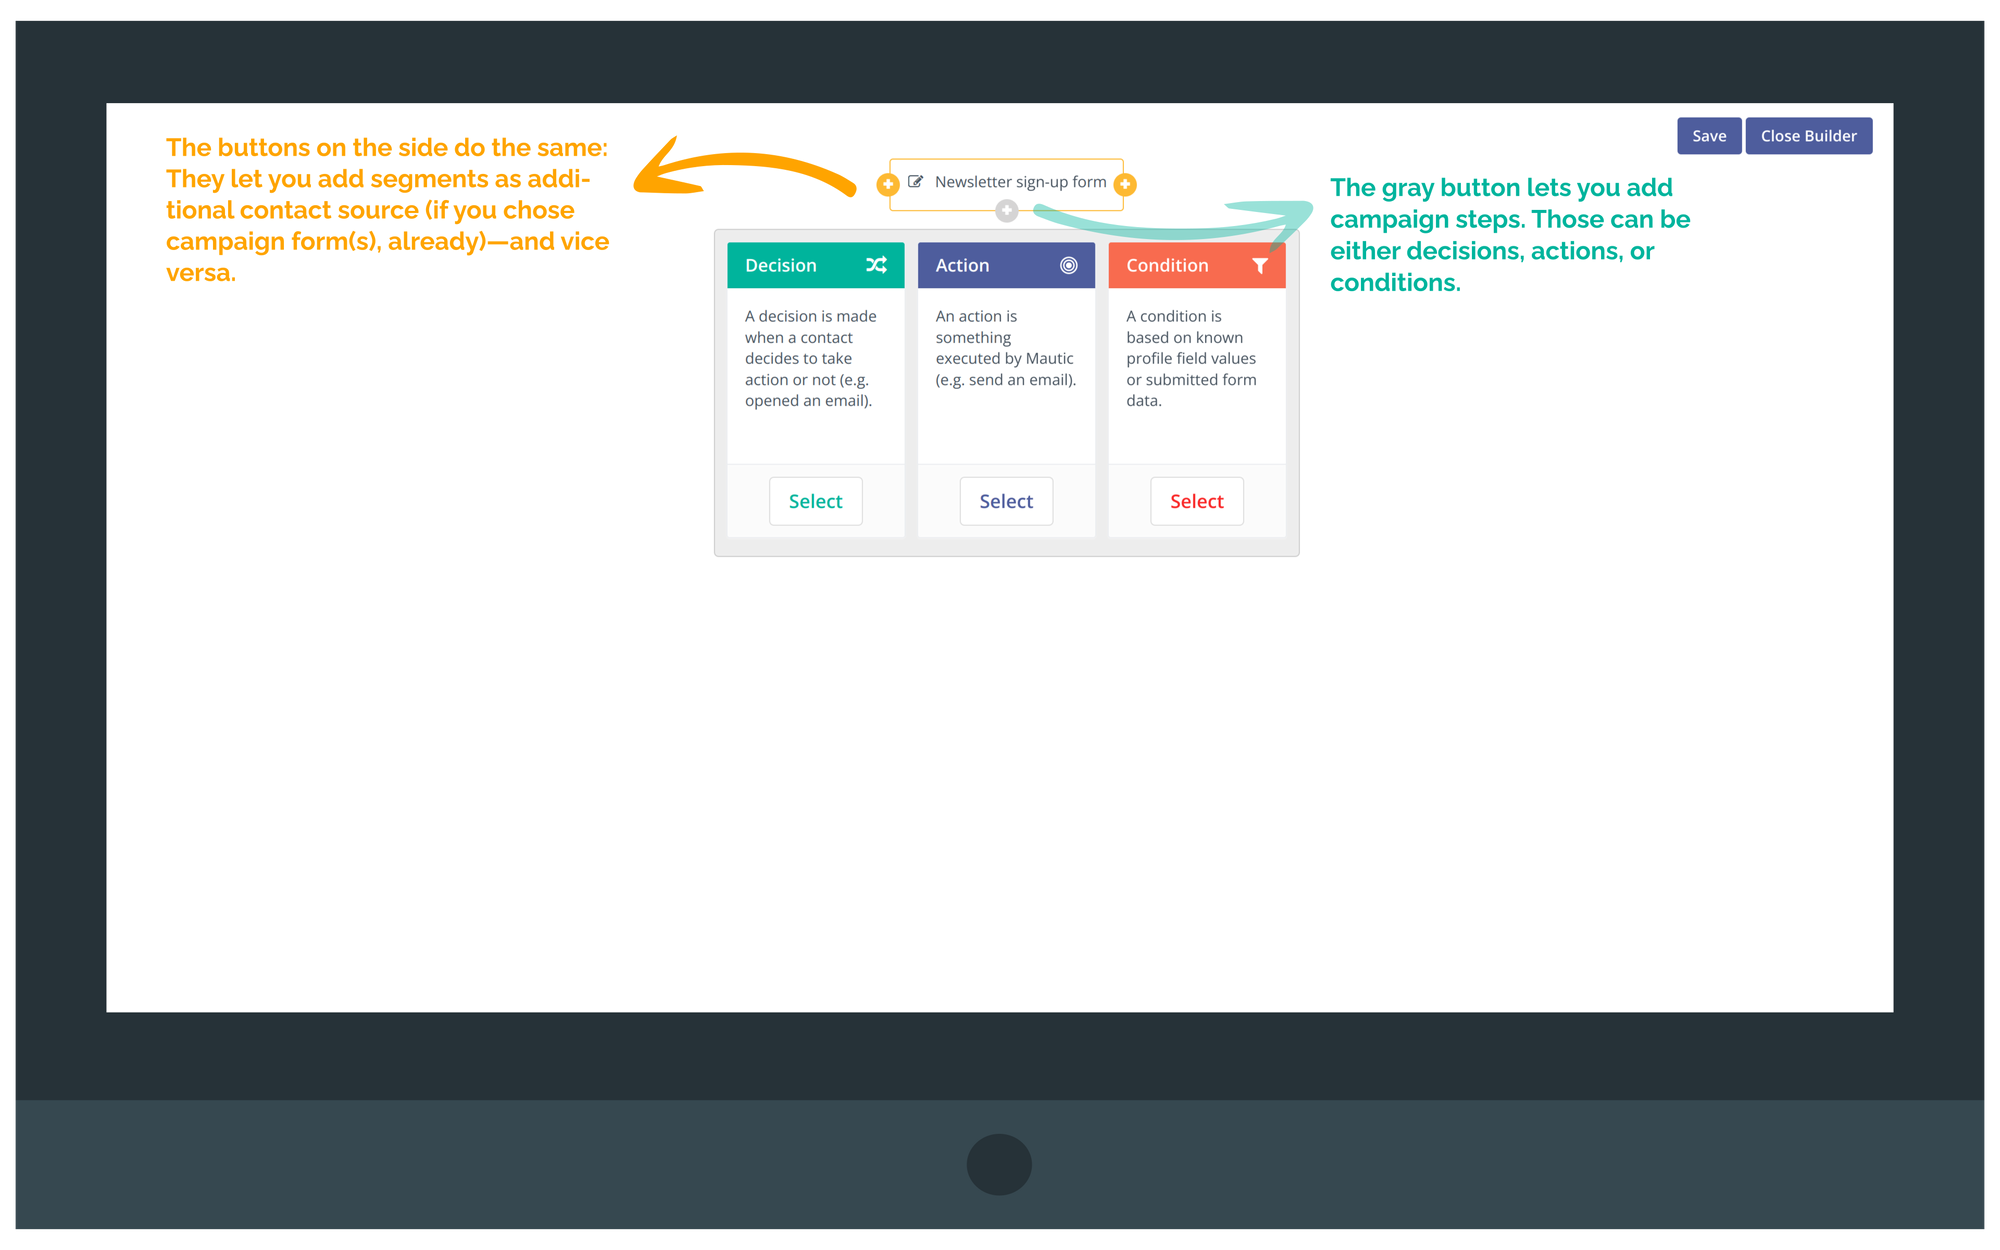
To add the first drip email to your campaign:
- Select 'Action'.
- Find the 'Send Email' action, and click it. This will add it onto your campaign 'Canvas', connecting it to the source you previously defined.
- Upon selecting the 'Send Email', a properties box will pop up. Here, you can configure the specifics of your this action.
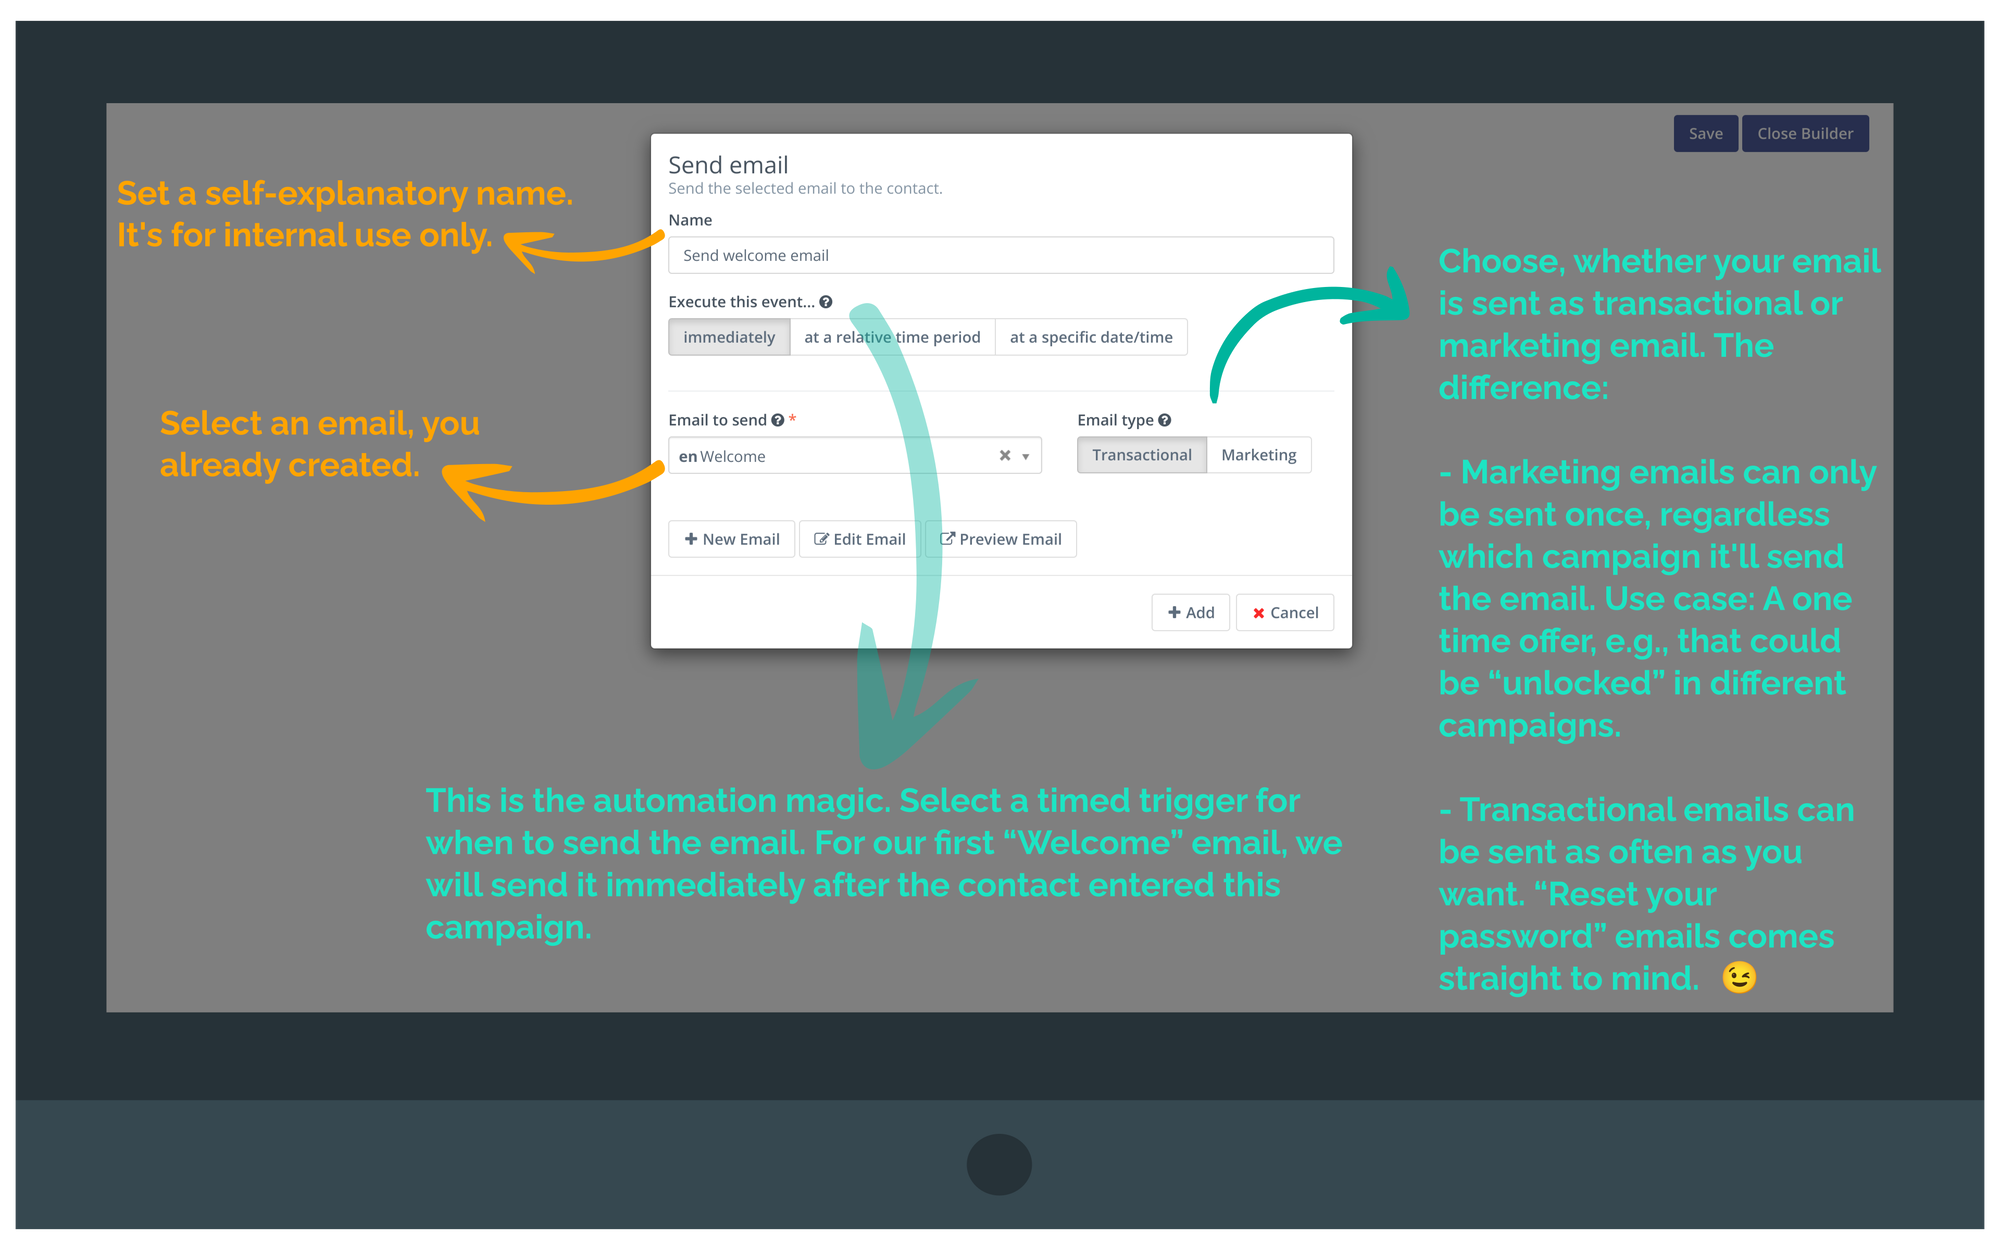
In this dialog:
- Set a self-explanatory name (for internal use).
- Select the email to send from a dropdown of pre-made emails.
- Don't change the event execution delay setting for now.
Your first drip email is set up! Every new lead that subscribes to your newsletter via the sign-up form will now:
- Enters this campaign, and
- receive the “Welcome” email immediately.
An email drip campaign wouldn't be a drip sequence if there weren't some more emails. That's why it's also called an autoresponder, after all.
So, click the plus icon on your “Send welcome email” campaign step, and add another “Send email” action.
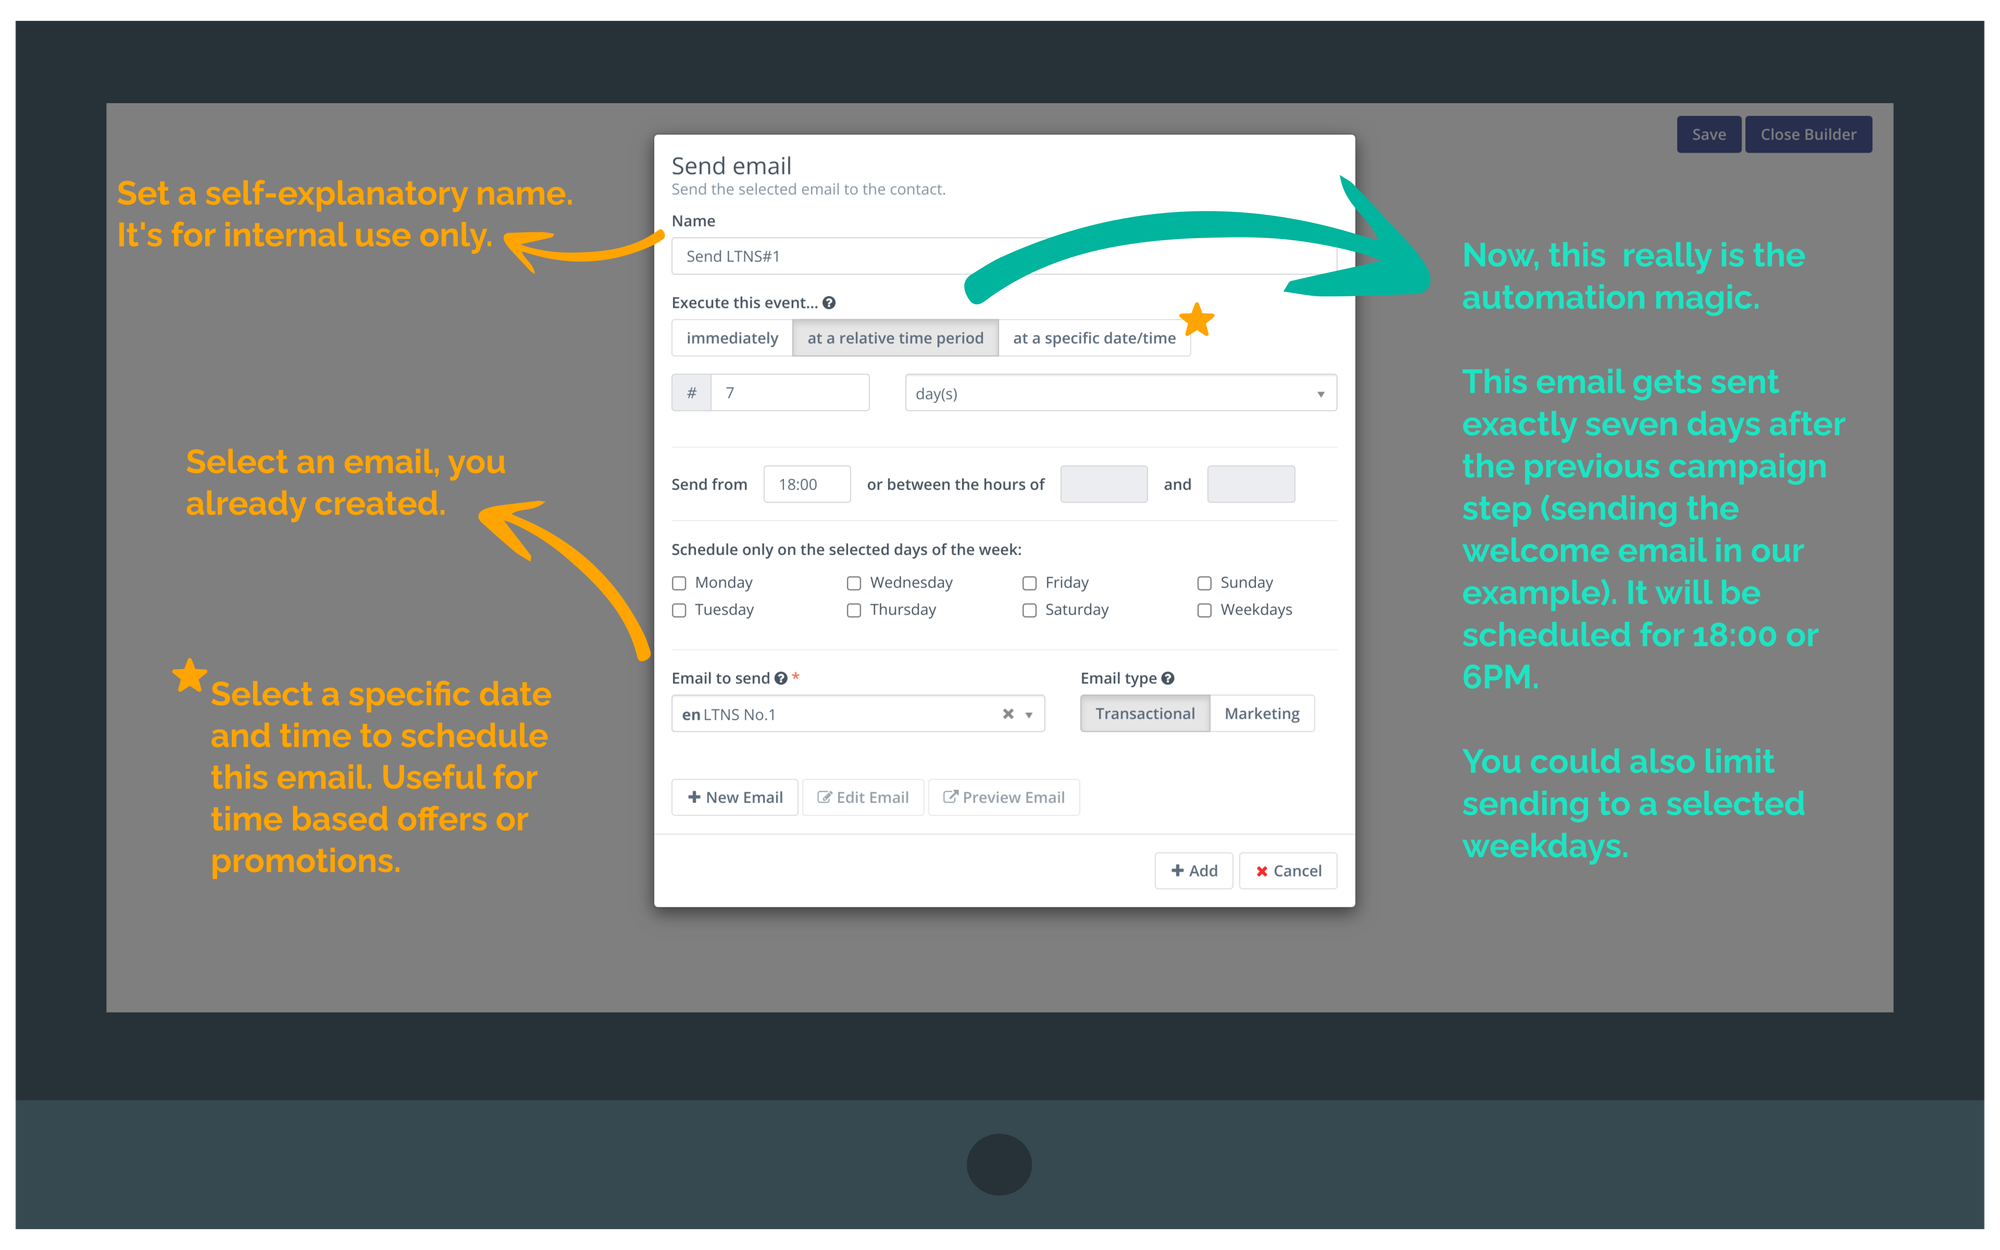
In this dialog:
- Set “Execute this event” to “at a relative time period”.
- This will let you schedule sending the selected email after a certain time, relative to the previous campaign step, has passed. Think of a timer that starts after the previous step. Only after it reached zero, this particular step gets executed.
- This makes the automation power of a campaign. We leverage it by setting the delay to seven days. Only after seven days have passed since sending the “Welcome” email will Mautic send the selected “LTNS No. 1” email.
Generally in an email autoresponder / drip sequence you'll want to:
- Send the first email “immediately”, and then
- add additional “Send email” actions for “1 day later”, “7 days later”, and so forth. Just choose a delay that fits your needs.
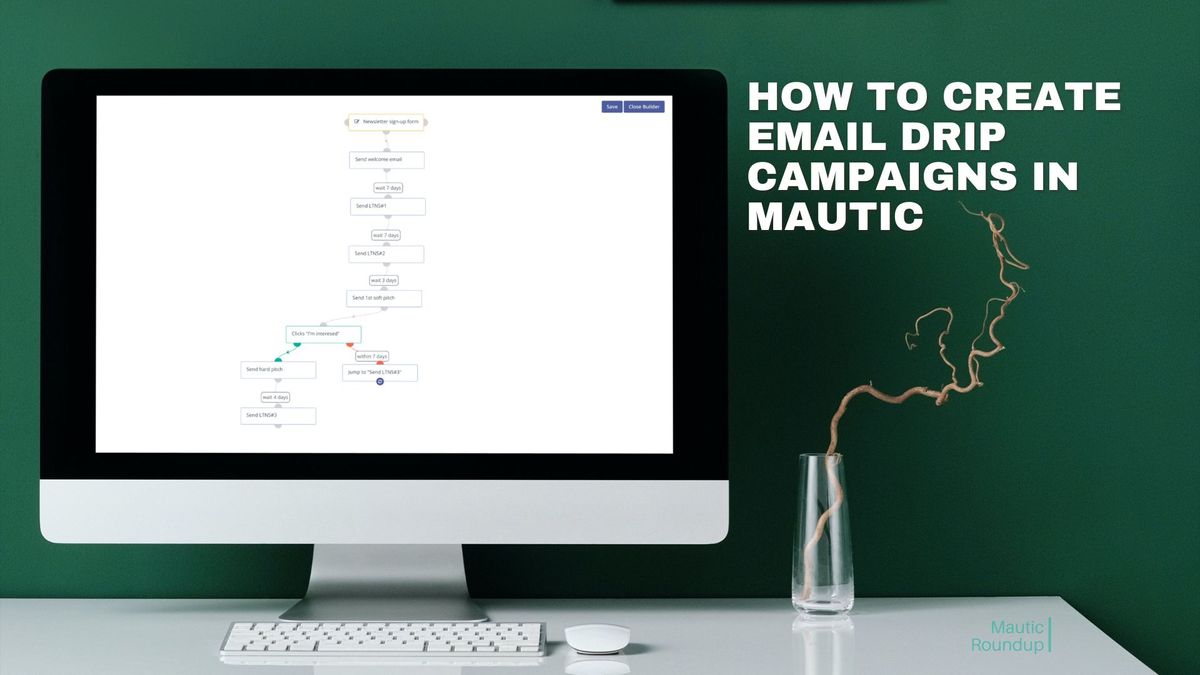
A sample autoresponder campaign might look like this:
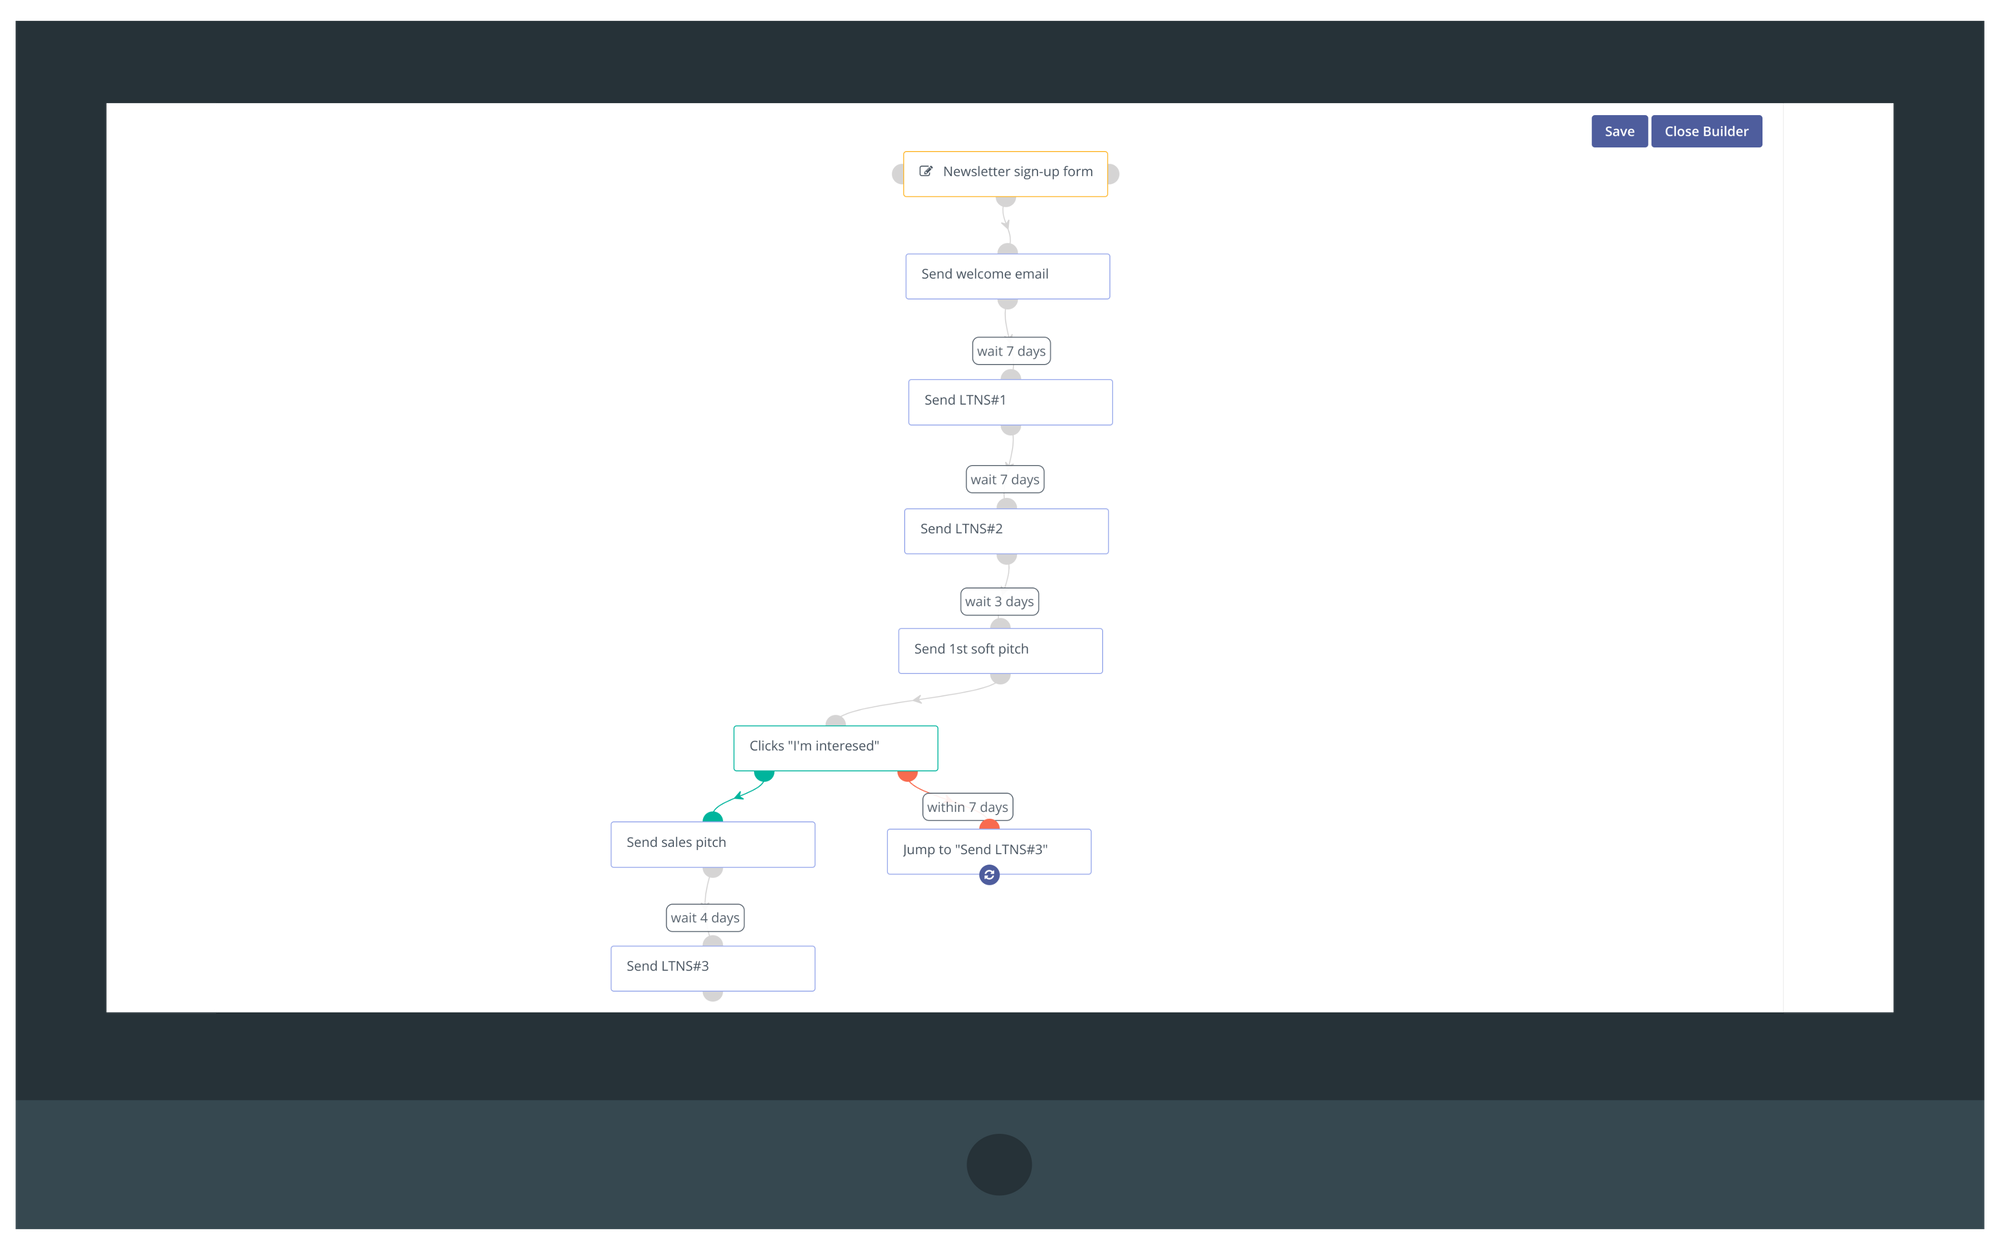
A successful drip campaign delivers relevant content timely. Think about how often your audience would want to get an email from you. Design your actions accordingly.
You can close your campaign builder now, and save your campaign.
Before you save and publish your campaign to go live, you should consider testing your campaign. Avoiding facepalm moments is important 😉
Step 5: Testing Your Campaign
Before you launch your campaign, it's wise to conduct a few tests to ensure everything is running smoothly. Even if you're confident in your set-up, it never hurts to double-check.
A single misplaced email or misconfigured action can impact your campaign's effectiveness and hurt your relationship with your audience costing you trust.
Here's how to test your Mautic drip campaign:
Create a testing Contact Segment or Form in Mautic. Add your own email to it (or submit the form).
Set this testing segment/form as the contact source in the campaign builder (you can change it back to your original source later).
Run the campaign and monitor the results closely.
- Are the correct emails sent out?
- Are the emails arriving as planned and at the right time?*
- Is the content in the emails displaying as intended?
- Do certain actions (open, clicks, replies, and so forth) trigger the correct campaign steps?
*Unfortunately, you can't speed up delayed actions. So, if you send four emails, and you set a delay of seven days in between them, you'd be stuck testing the campaign for three weeks. The only workaround I know is to set the waiting period to a couple of minutes. If you know a better way, please shoot me a message.
Once you're satisfied with the testing and any issues have been addressed, you're ready to replace the testing contact source with the original one and get ready for the official launch.
Remember to monitor the campaign's performance closely in the beginning. Mautic provides detailed reports that allow you to track the open rates, click-through rates, conversions, and other metrics you fancy. Use this data to adjust and optimize your campaign for the best possible results.
So, take a deep breath, dive in, and happy emailing!
Stay tuned to MauticRoundup for more tutorials, tips, and strategies to level up your email marketing game. As always, we're here to support you in your marketing automation endeavors!
Email Drip Sequences—Easy but Powerful Marketing Automation
Email drip sequences are a powerful, yet easy to set up, tool for your email marketing. The automation allows you to focus on more pressing issues. Be it product ideation, content creation, or driving sales.
If you miss setting up at leas one drip sequence, you miss an easy way to nurture leads, engage subscribers, and drive conversions.
This guide provided you all the information you need for setting up your first email drip campaign. If there's something missing, or if you have troubles with one of your campaigns, shoot me a message.
Remember, the beauty of email marketing using a tool like Mautic roots in the ability to continually learn, tweak, and optimize. Build a simple drip campaign, first. Then monitor your campaign performance, adjust as necessary, and add more sophisticated steps to personalize your subscribers experience. Aim to continually deliver valuable, timely content to your subscribers.
Subscribe to the MauticRoundup newsletter get regular tips and tricks about email marketing, and never miss a important development around Mautic.
Happy email marketing!
How do you create a drip campaign in Mautic?
To create a drip campaign in Mautic, you need to
- create a new campaign from within Mautic's dashboard,
- set a name and configure basic settings,
- open the campaign builder, and select a contact source (contact segments or campaign forms),
- define your campaign actions,
- use conditions or decision steps to personalize the campaign,
- save your campaign, and publish it.
- Last, but not least: Track the campaigns performance and iterate to improve it.
How can I test a Mautic campaign before launching it?
Before launching a campaign in Mautic, it's crucial to test it:
- Create a test segment, and add your email address to it.
- Add the test segment to your campaign.
- Run the campaign and check if Mautic performs every action as intended. Tweak your campaign, if necessary.
You can't speed up delays between actions. Either you wait. or you set the delay to a couple of minutes for testing purposes.
What are the benefits of using drip campaigns for email marketing?
Drip campaigns offer several benefits for email marketing.
- They allow for automated, timed communication with your audience.
- The uttermost benefit is that drip sequences will nurture leads over time, increasing engagement, and ultimately driving conversions.
- You nudge your subscribers to provide information about themselves. That way, you'll gain greater insight into your audience and can segment your leads better.
- If done well they also provide a personalized experience.
What is a contact source in a Mautic campaign?
A contact source in a Mautic campaign determines who will enter your campaign and receive your drip emails. You can use either contact segments or campaign forms as contact sources.
- Contact segments let you target a specific subset of your audience.
- Campaign forms will add everyone who submits the form to your campaign.
How long should a drip campaign be?
As a drip sequence is a series of automated emails it has to be at least two emails. The rest is completely up to you and your goals. Your sequence could be
- a short 3 to 5 emails long sequence spanning a couple of days introducing your brand and building your know-like-trust-factor, or
- a twelve-week-long sequence with an email per week guiding your lead through the AIDA stages aiming to convert them into a customer, or even
- a full year-long sequence with useful business tips.
What does the “publish” state mean in a Mautic campaign?
The publish state in a Mautic campaign indicates whether your campaign is active or not. When a campaign is set to “Published”, Mautic will start executing the defined actions based on your set conditions and decision points.
How does the '(Un-)Publish at' setting work in Mautic?
Once you've set your Mautic campaign live, the 'Publish at' and 'Unpublish at' settings allow you to precisely schedule the start and end times of your campaign execution. Mautic
- won't execute any campaign actions before your 'Publish at' date time, and
- won't execute any campaign actions after your 'Unpublish at' date time.
This feature is useful for planning your campaigns in advance. By setting both, the 'Publish at', and the 'Unpublish at' date time, you can select a specified time window, in which your campaign is active. This is be convenient for seasonal promotions or limited-time offers.
Comments ()