How To Extend a Finished Campaign in Mautic

Are you trying to add a new email to a campaign in Mautic, but find that your old contacts are not receiving them?
Imagine this: You crafted a good marketing campaign, and your audience has actively participated. At some point your contacts will finish the campaign. But what next? How do you target those contacts, specifically?
If you just add an additional email to the campaign those, who already finished it, won't receive it. That might become a big problem:
You could face missed opportunities for engagement and sales. Your email marketing efforts' effectiveness will decrease. So, what's the reason for those contacts not receiving your campaign emails?
Mautic Doesn't Send Emails After Finishing the Campaign
There's a simple reason why your contacts won't get those emails you added to your campaign:
Your contacts have already finished the campaign. Mautic won't consider them part of the campaign anymore. Therefore, it won't send them any emails you added.
How can you send those people your valuable content regardless?
You need to rephrase the question: How can I segment contacts who finished a campaign in Mautic?
The gist is to create a segment. You can use the segment for broadcasting emails—the ones you send/schedule manually. While simple in theory, the main challenge is to target exactly those who qualified for the campaign and finished it, already.
Luckily, Mautic offers a tool for that.
You can leverage a built-in filter for segmenting contacts. It's called Campaign Membership. You can use this filter to segment contacts who are either member of a particular campaign or, well, not.
Now, you might think:
I could just use this filter and go ahead.
Nope.
Why not?
Because simply filter for Not member of campaign XY acts like some sort of catch-all. Everyone who isn't a member of the campaign—not just former members—becomes member of this segment using this simple filtering. In almost any case this is undesirable.
So, how to do it correctly?
There are a variety of different set-ups when it comes to creating campaigns. In this guide, I'll cover a set-up, which demands the most work. It should be easy to adapt the steps shown here to your specific set-up.
Set-Up: Campaign Based on a Form Without Tagging
I find, this is the hardest set-up, because you basically don't know anything about the contacts who are in your campaign. That's the basic set-up:
Set-Up
- You created a campaign. I'll use a six email long nurturing campaigns. Each is named
LTNS No. [1-6]. - You have a form, which acts as your campaign's contact source.
- You haven't added any additional information, like tags, to your contacts (not needed, as they come directly via your form).
Let's look at the solution for this setup:
Solution
The idea of the solution is simple: We rely on a tag that is tied to the (former) campaign membership. Everyone who has the tag but isn't a member of the campaign, must have finished it. A missing campaign membership in combination with the tag is our clear indicator that the contact have been but isn't a campaign member anymore.
not a member of campaign X to those who actually have been a member.The solution consists of three steps:
- Create an auxiliary segment, which targets all contacts who received the last email of our campaign.
- Create an auxiliary campaign based on the new auxiliary segment, to tag the identified contacts.
- Create a segment used for production using the new tag.
Let's begin with creating the segment.
Creating an Auxiliary Segment
First, we need an auxiliary segment. Its sole purpose is to help us tag the contacts, who had something to do with our campaign. We'll find those contacts by looking for who got a specific email:
- Open your (best case: unmodified) campaign and look for the last email your contacts received before they finished the campaign.
- Create a new auxiliary segment. Name it, e.g.,
LTNS Contacts(the name isn't that important as we'll delete this segment after it has done its job. I named it—not overly accurate—LTNS finished). - Add a
Was sent a specific emailfilter to the segment to target for the email you identified. - Additionally, add a filter
Campaign Membershipand target those contacts who are still in your campaign. Use theORclause to connect both filters.
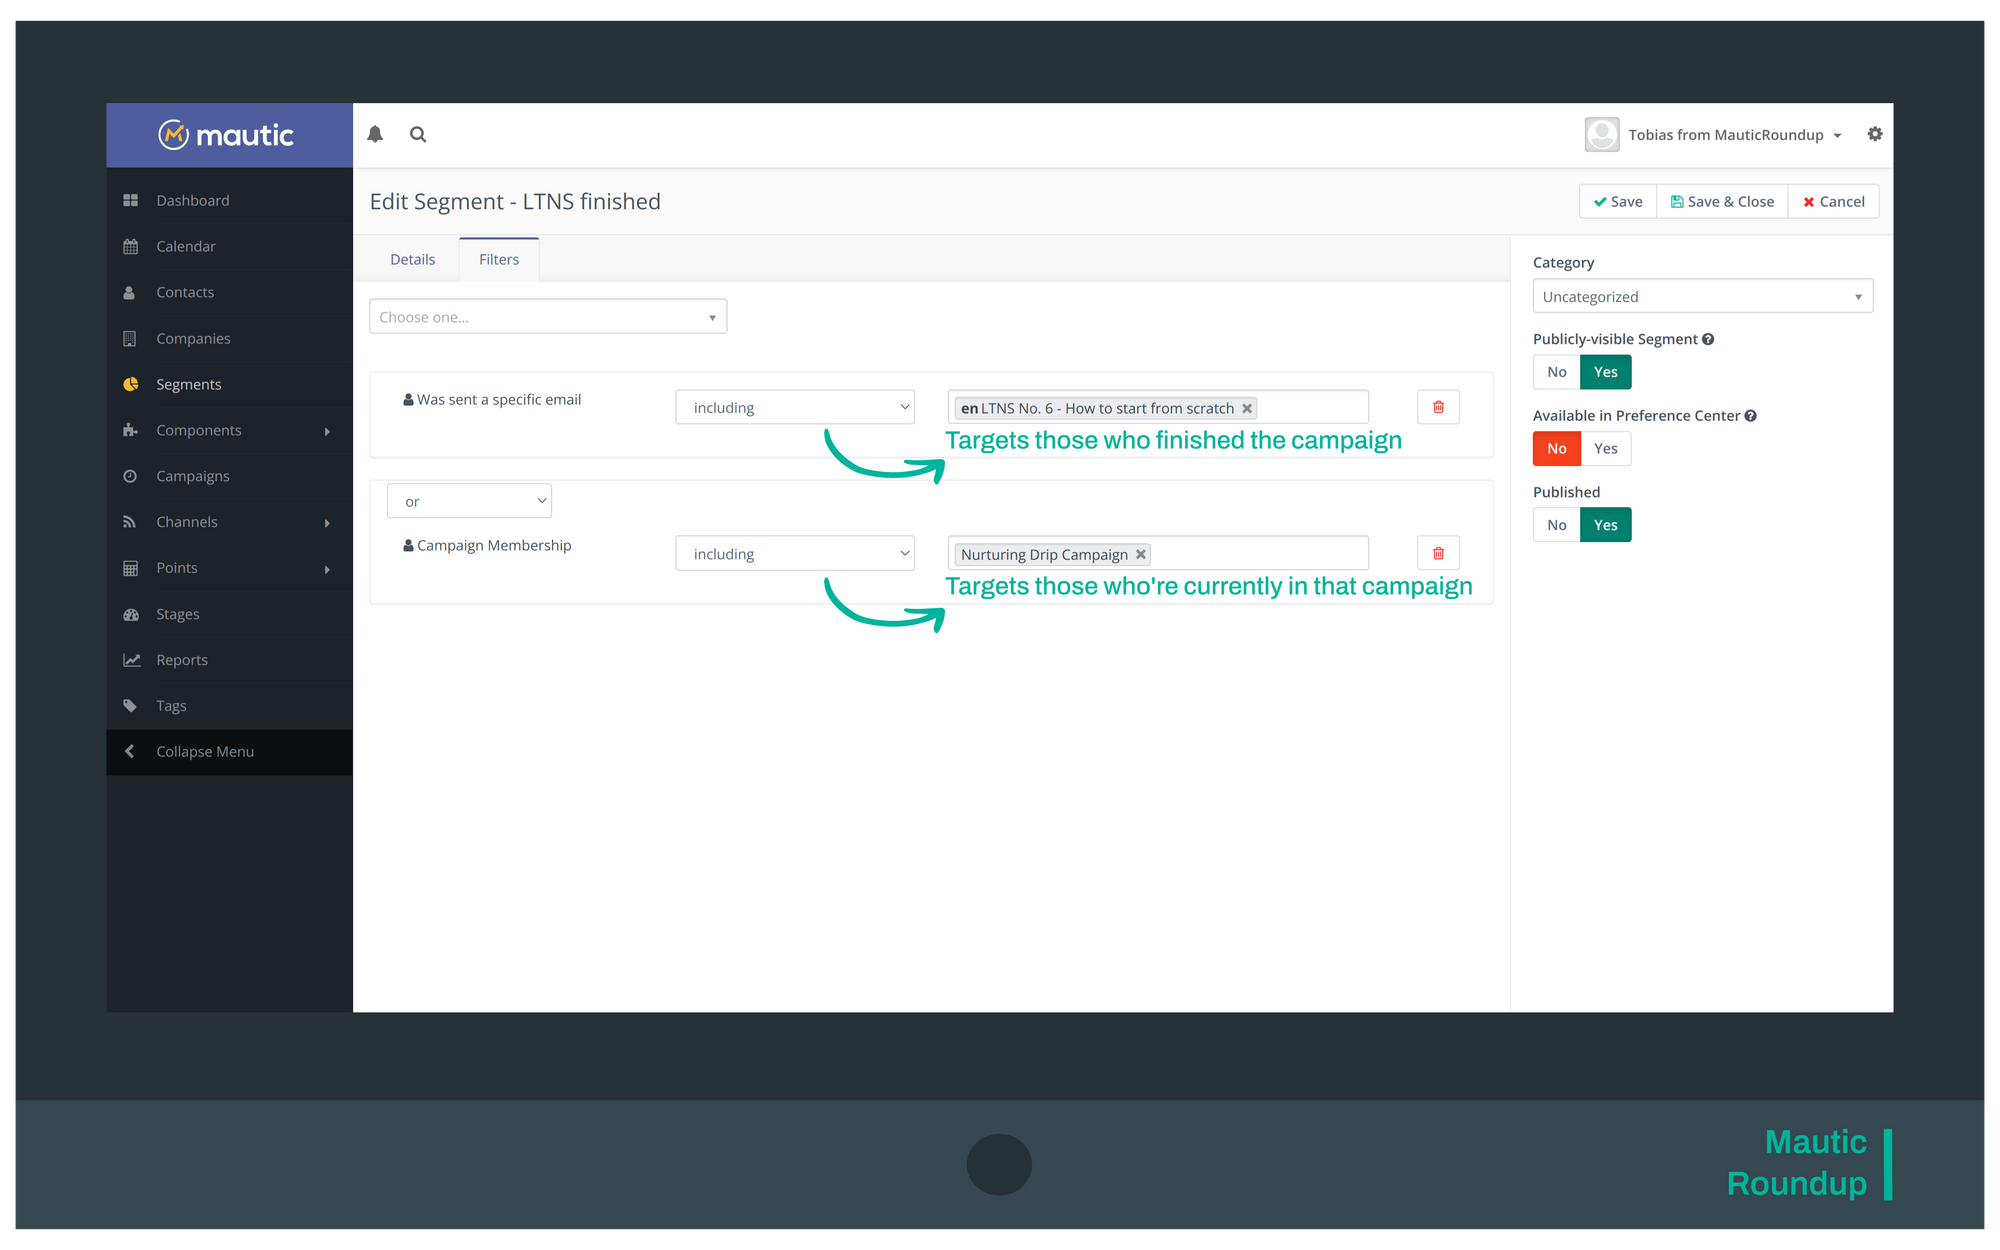
AND or OR. In a nutshell: If you use AND both (or every if you're using more than two) conditions have to be met (i.e., be TRUE in technical lingo) to become a member. If you use OR it's sufficient for a contact to meet just one of the defined conditions to become a member of the segment. OR is what we want here. Either they received this email, OR they still are a member in the campaign.In my example the campaign had six emails, originally. Those who received the email LTNS No. 6 - How to start from scratch are the ones who finished the campaign.
Now, lets tag them:
Creating an Auxiliary Campaign for Tagging
To segment the contacts who finished the campaign we need to tag them.
- Create a new auxiliary campaign.
- Select your
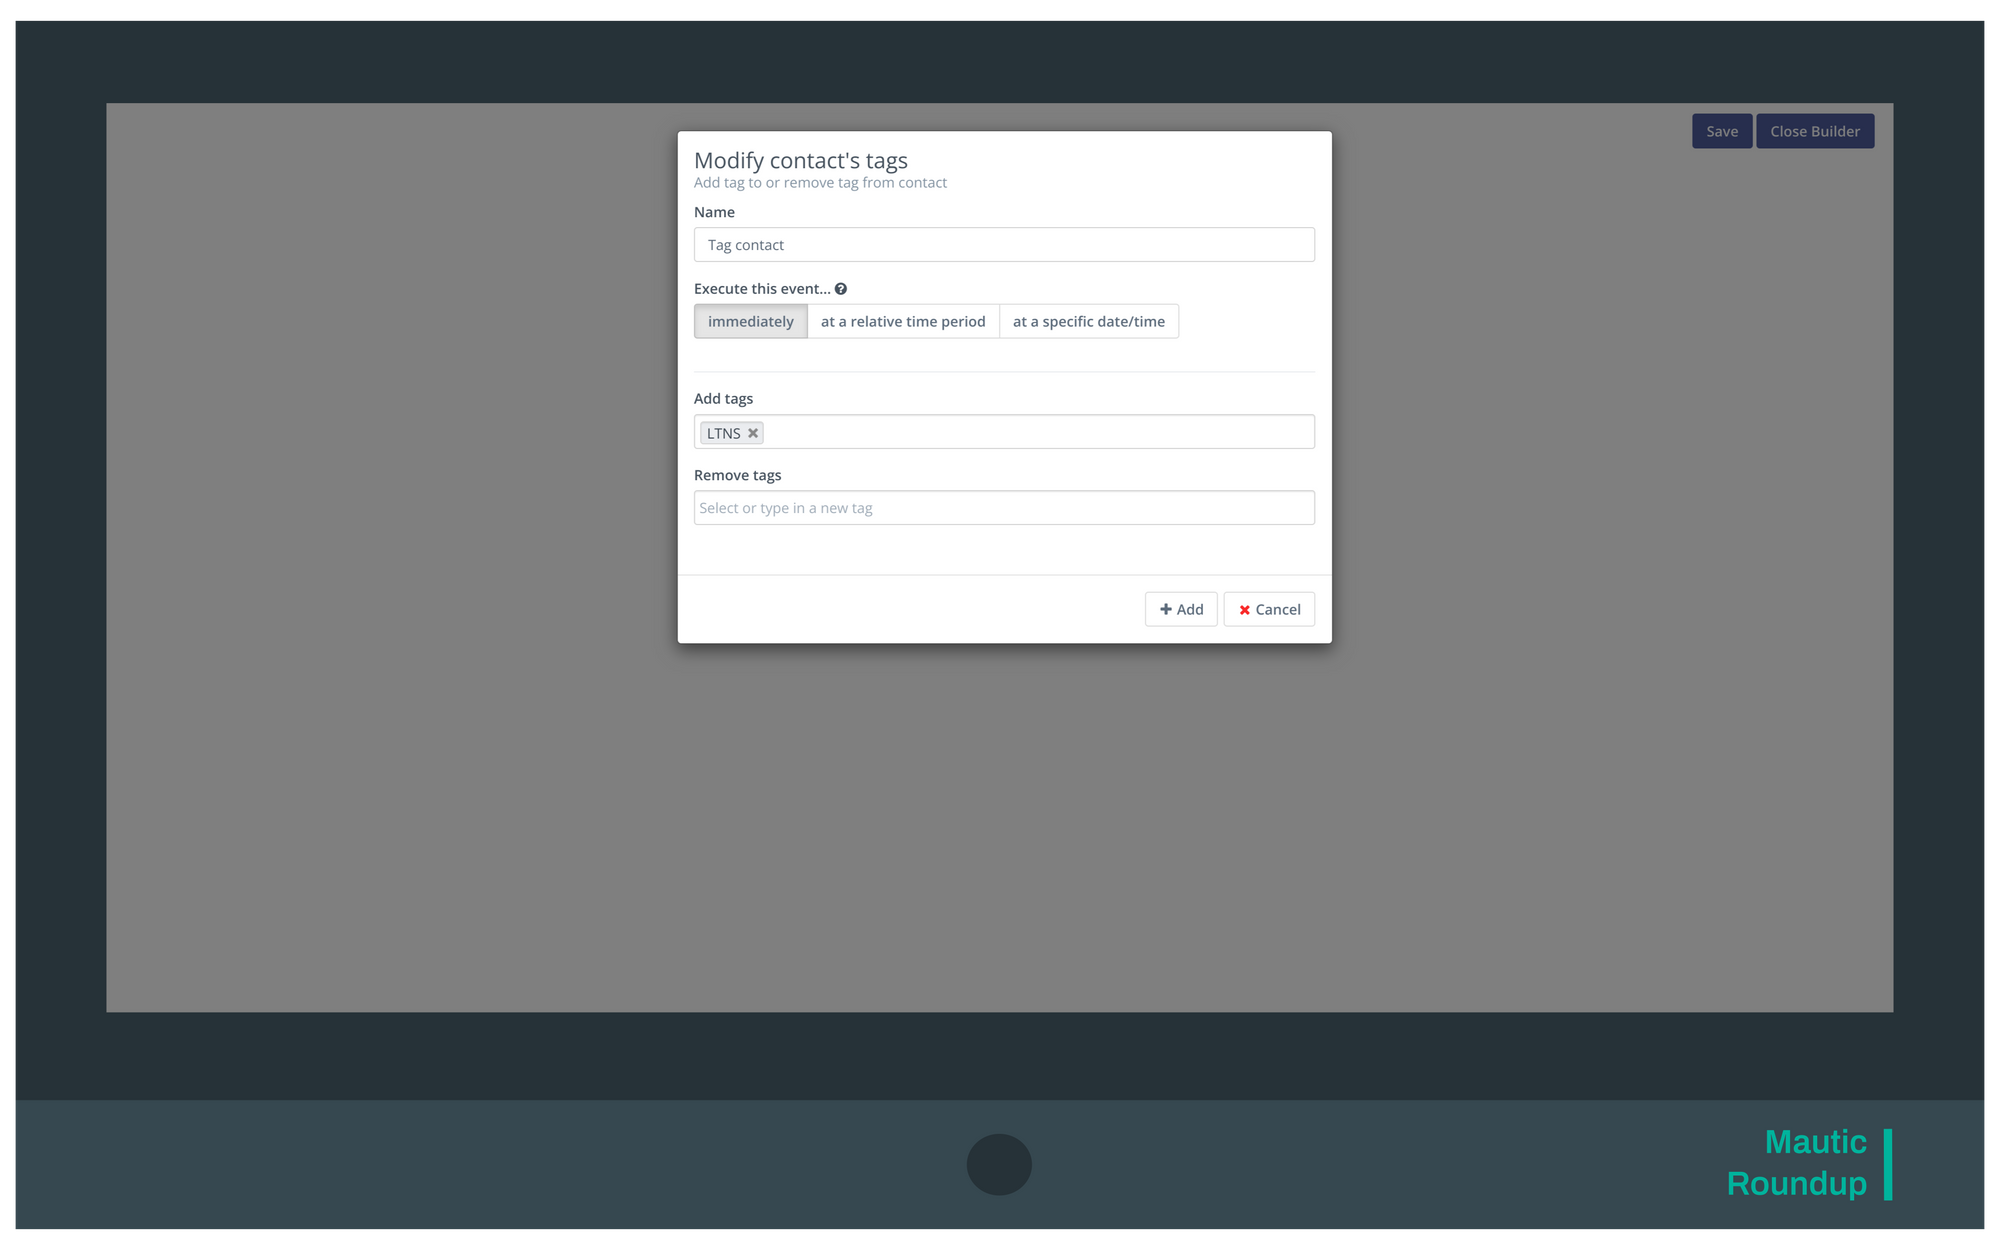
LTNS Contactssegment as contact source. - Create a single step:
Modify contact's tags. - Configure it to set a new tag called
LTNS.
After Mautic ran this campaign it processed and tagged all of your contacts who currently are or formerly were in the campaign. You could now delete (or unpublish) the auxiliary segment and campaign.
We'll to rely on this tag for segmenting contacts who finished the campaign.
What about future contacts?
Well observed! To make our solution future-proof, you need to do one more thing:
- Modify your existing drip campaign.
- Add an additional
Modify contact's tagsaction right at the beginning of it. - Configure it to add the tag
LTNSto the contacts entering the campaign.
This ensures future contacts get tagged accordingly, too.
Now, we're ready to implement our set-up that allows us to target contacts who were previously a member of our campaign:
Create the Segment Used For Broadcasting Emails
With the tag in place you're finally able to create your final segment for production. After the heavy lifting is done, this is quite easy:
- Create a new segment. Name it however you like. I like to name it:
[Campaign] Broadcast. Here,[Campaign]is a placeholder for your campaign name. To me these are meaningful, self-describing names. - Add the following two (or more) filters. Combine them all with
AND:
Campaign Membership|excluding|Nurturing Drip CampaignTags|including|LTNS
This is all the magic we were talking about: Looking for contacts who are not a member of a specific campaign, but have a particular tag indicating they once were.
(Obviously, you have to use your campaign name and tag, here.)
Because of the catch-all mechanic of the membership filter, Mautic would add contacts to your segment that are just dead weight. Fortunately, there are filters to deal with it.
- People who unsubscribed. Those wouldn't get your emails anyways but distort the membership count.
Remove them by adding this filter:Unsubscribed - Email|equals|No - Unidentified contacts. Basically the same as with unsubscribes.
Remove them by adding this filter:Email|not empty
If you want to re-engage contacts who haven't been active in a long time, you can add this filter, too:
Date Last Active|greater than or equal|-180
Other Set-Ups
I said initially that there a variety of set-ups, when it comes to creating a drip campaign. The one illustrated above seems to me to be the hardest to deal with.
Let's look at two other examples and sketch out how you could extend those finished drip sequences:
- Contact source is a form, but contacts get tagged at form submission: Easy, you already got your tag.
- Contact source is a segment: Easy, too. Just use the segment. Filter for
Campaign Membership; excludesand combine (usingAND) with the filterSegment Membership; includes; [YourSegment]
Having questions? Post a comment! Comments are available to subscribers.
If this article was helpful, please subscribe to the Audienture Newsletter and get more insights and practical tips on email marketing and marketing automation in your inbox. It's free!
Happy marketing!
Comments ()